Friday, April 27, 2012

A Day With My Grandson

I had my baby boy yesterday.  Wanted to share a couple of pictures I took of him.  He is just too cute!!


Thursday, April 26, 2012

My Disney Swap

I signed up to swap at Disney this year.  We make 26 swaps and turn them in and then we will get 25 different swaps back!  This is what I decided to do for my swaps.  It is a magnetic post it note holder with a mini pen.  Isn't it cute? It is made with the Scallop Envelope Die and the Big Shot.  I also used the Summer Smooches DSP and the Bright Blossoms Stamp Set.


Wednesday, April 25, 2012

An Exciting Time -Out with the Old in with the New

This is an exciting and sad time of year for us as Demonstrators and you as customers!  We hate to see the old go away but the anticipation of what is to come is so exciting!  I hope you will take a little time out of your busy schedule to view these lists and make sure you get what you want and need before it is too late.

The Retiring Accessory List is out.  It is HUGE!  I for one am very sad to see all of this stuff go away, BUT I know Stampin' Up1 has great things in store for us,  I can't wait to see all the NEW products!  With that said, please take a look, because I KNOW there are things you want to get before they go away.  Supplies on accessories are always limited, so the quicker you order the better.  You can order  from my online store and it will be shipped directly to you or you can contact me and I will place the order for you. You can view the Retired Stamp Set list HERE and the Retired Accessory list HERE.


You may notice that all of our Stampin' Pads are listed. This is for two reasons: (1) Craft Stampin' Pads will only be available in black and white; and (2) we are introducing a new Firm Foam pad in our Classic Stampin' Pads with the 2012-2013 annual catalog.
In addition, please note the following about the new catalog:
  • Only select Stampin' Write Markers will be available individually (Stampin' Write Markers in color collections will continue to be offered)
  • 12" x 12" Textured Card Stock will no longer be offered
  • 12" x 12" Smooth Card Stock will only be available in select individual colors and color collections 

    This year the new annual core catalog will be available on June 1st.   

April Simple Card Class

Here are the cards we did last night at my Simple Card Class.  Hope you can make it next month.  This class is always held the 4th Tuesday of the month unless I let you know otherwise.  It is at my house and starts at 7:00.  We are usually through by 9 or 9:30.  You need to let me know a couple of days in advance if you want to attend.


Tuesday, April 24, 2012

Baby Shower in the Works!

My youngest daughter Jennifer is having her second baby in July.  It is going to be a girl this time!  So my other daughter Megan and I are putting together a baby shower that will be held in May.  The theme is birds and old/vintage style.  The colors are blue and coral. Here are a couple of things we are doing.  I am using Stampin' Up! Ruffled Ribbon in Calypso Coral and Pool Party on the Diaper wreath.  (Got this great idea from Pinterest, but it was too plain so I added the birdnest to the center!).  The table center pieces are old Mason jars filled with birdseed.  We cut peach tree branches and spray painted them white and will add a big sprig of Rosemary.  The bird is cut with the Big Shot using Bird Die.  It is made with Calypso Coral Card stock and rand through an embossing folder.  We used different textures on each of the birds. Of course I had to add  rhinestones for the eyes.  For the favors we fashioned bird nests with excelsior and put dove chocolate eggs in the nest (bought these after Easter on sale!).  The tag is made using the Decorative Label Punch and the Stamp set Best of Everything. I had that cute coral ribbon left over from Sale-a-Bration to tie around the Small cello bag.  I will share more as we get more done or after the shower.  I will take lots of pictures of the decor!


Simple Card Class- Sneak Peak

I am posting one of the cards we will be making tonight at Card Class.  I will post the others tomorrow.


Sunday, April 22, 2012

Tri-Fold Picture Holder

I wanted to post a new project I just finished.  We actually made one of these several years ago at Leadership.  It was different colors, stamps and a slightly different size because we used envelopes that we no longer carry.  I had a customer ask me about this project and what envelopes it used.  I apparently did this as a class or at a stamp camp at one time. I have done so many projects, I didn't remember and I can't find my original sample, or I would post it. When she showed it to me, I got excited and decided to try to make an updated one with different envelopes, colors, stamps, etc.  This is what I came up with.


Supplies
Stamp sets: Creative Elements and Bright Blossoms
Card Stock: Real Red, Daffodil Delight, Tempting Turquoise, Tangerine Tango, and Lucky Limeade
Ink: Island Indigo, Lucky Limeade
Markers: Real Red, Daffodil Delight, Tempting Turquoise, Tangerine Tango
Summer Smooches DSP
Silver Mini Brads
Grosgrain Ribbon: Real Red, Tempting Turquoise, Pumpkin Pie
Punches: Small Oval, 1" circle, 1 1/4" Circle and 1 3/8" Circle
Open End Envelopes

I cut 2 pieces of Daffodil Delight CS, one is 5 1/2" x 4 1/2", scored at 1 1/2" and 1 3/4" 
the other piece is 8 1/2" x 4 1/2", scored at 1" and 4 3/4"
The one inch flap on the 8 1/2 x 4 1/2 piece is adhered to the inside of the 5 1/2 x 4 1/2" piece at the bottom. This makes the total length 13 inches.

The red pieces inside are 5 3/8" x 3 1/2", scored at 1" on short end
I cut off 2 1/2" from the flap end of envelope.  I stamped my envelope the adhered it to the 1" red flap.  Adhered this whole piece into the folder.

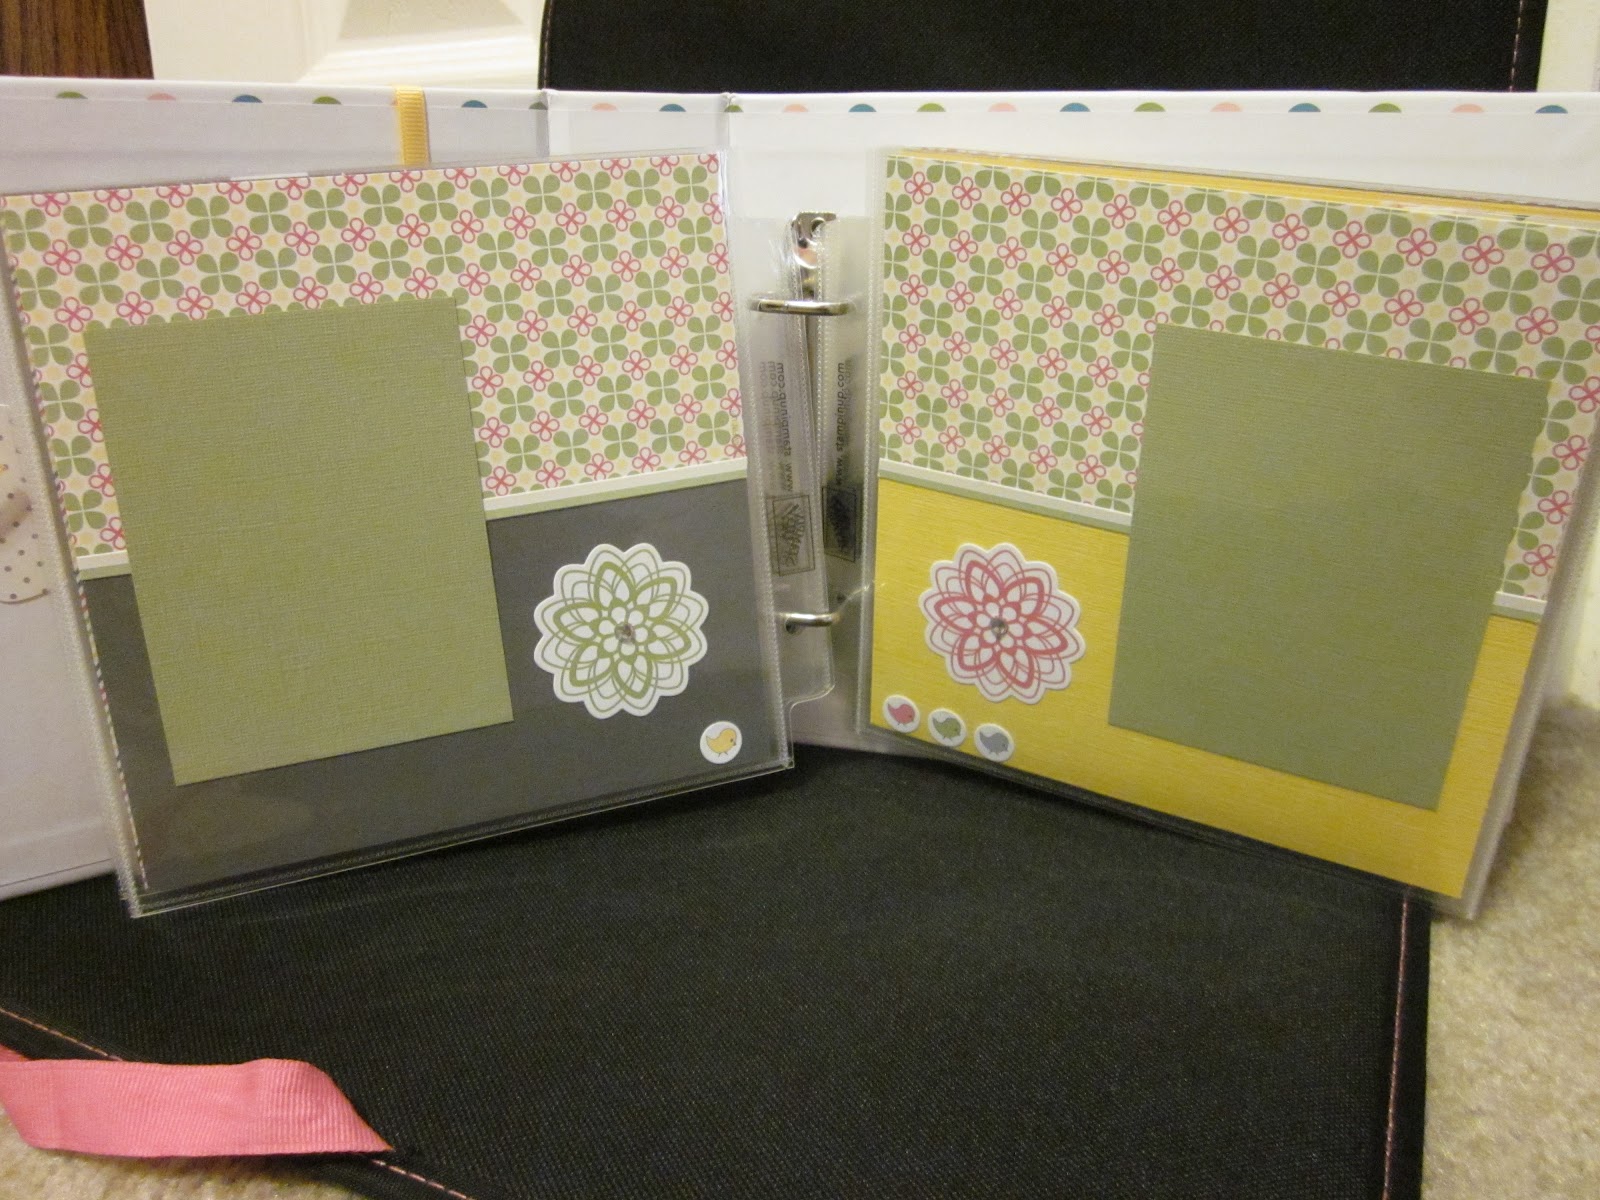
The little cards for your photos are 3 3/8" x 4 1/4".  The little piece of DSP on the end is is 3 3/8" x 1".

Belly Band is 8 1/2" x 1".

You can put pictures on the Red CS under the envelopes and you can put pictures on both sides of the slide in card also.


Wednesday, April 18, 2012

Spring Fever Scrapbook Class


I am offering another Class for you. Spring Fever Scrapbook Class is a fun class where you will complete a 6 x 6 scrapbook using our Spring Fever Scrapbook kit from the Mini Catalog.  I did a Christmas Scrapbook in January and every one who came loved it!  This one is similar but bright and fun for Spring pictures! You get a good deal if you order 2 books!  You will only complete one in class, but then you a have the materials to complete your second one at home.  Everything is pre-cut for you so you just have to put it together. I hope you come enjoy a relaxing fun morning putting this scrapbook together! Now, the Spring Fever Scrapbook kit goes away when the Occasions Mini Catalog expires.  This is why I need your reservation and check by the 27th.  I HAVE to order before the catalog ends.


Class Includes: Polka Dot 6x6 Ring Album, Rhinestone Jewels and completed 20-page layout.   
Class fee is $45.00
Bonus** add another $20 for an additional Polka Dot 6x6 Album to create TWO 6x6 albums!!!
For Less than $35 each, you will have 2 beautiful, BLING filled albums. One to give and One to keep for YOUR 2012 Easter, Mother’s Day, Spring Flower Memories!!

Date and Time:
Saturday, May 26th @ 10:00am – 1:00pm
NOTE** You will create ONE (1) full book in class and create the 2nd book at home with all the supplies provided.

Linda’s House
5825 Lyons Road, Garland, TX 75043

Deadline is Friday, April 27th for time to order supplies.
RSVP and Mail your Check today!!!
Space is limited, and will be filled on a first-come, first-served basis! You are welcome to bring a friend,
but all guests must be registered due to preparation of cardstock for each attendee.

Sunday, April 15, 2012

Retired List Is Now Available!


RETIRED LIST AVAILABLE!

Dates: April 15-May 31, 2012 (select items available while supplies last)

Details Hundreds of stamps and accessories from the 2011-2012 catalogs are retiring, and this is your chance to get them before they're gone. Many products are only available while supplies last, so be sure to get your orders in early!
When you view the retiring stamps list, you may notice it's longer than in years past. During this transition to the new annual catalog, there are a higher number of stamps being refreshed and replaced than usual. While many stamps are going away, most are being replaced so that the breadth of our stamp lines is every bit as broad as ever!

CLICK HERE TO VIEW RETIRED LIST

I am always sad this time of year!  So many of my favorites are retiring!  But...It is also fun and exciting to see what is coming in the new catalog June 1!!!!  In the mean time, make sure you look over the list and have everything you want from the current catalog, or you will be sadly disappointed when you can't get it any longer!

Saturday, April 14, 2012

My Aluminum Plant Stakes

Stampin' Up! asked me if I would be a presenter at the San Antonio Regional this past January.  I had an idea, so I said yes.  I started working on my samples and I couldn't stop myself!  I was addicted to creating these cute plant stakes!  I had seen an idea for one a year ago and had originally copied it, but once I made that one I found the possibilities were endless!  I had so many people asked me if I had a blog that I would share on, and at the time I did not.  So I am going to post them here now.  They are super easy to make.  You need a Big Shot, various Big Shot Dies, embossing folders, brads, Chalkboard Vinyl, Aluminum Roof Flashing (I found mine in a 10" x 10' roll at Loews), and the Wire I used is 12 gauge hanging wire (I also found this at Loews in a 100 ft roll).


Cut your aluminum into squares to fit on your die.  Run this through your big shot to cut the shape out.  Then put it in a embossing folder and run it through the Big Shot again. Use a Crop-a-dile to punch a hole in the shape you cut out.  The wire I cut with wire cutters and just used pliers to bend the end around to hang the cut out shape on. I also made the little jump rings myself.  I used thin wire, I think it is around 20 gauge.  I used my needle nose pliers and formed a double ring.  You attach your jump ring to your cut shape and then hang it on the 12 gauge wire. I did all kinds of fun designs. 
This is me presenting at the San Antonio Regional in January
The black labels are  Stampin' Up! chalkboard Vinyl.
See how I bent and curled the wire to hang my pieces from.

I first used a primer, let it dry then sprayed on a color..
I sanded off some of the paint from the raised

The flower is from the Island Floral Die.
Two Tags Die with Beautiful Butterflies and punched out the chalkboard vinyl


Oval Frame Die, Island Floral Die and Ovals Die

Spray paint and light sanding.  Scallop Circle Die
and Beautiful Butterflies Die


 Love the Elegant Bird Die!
Oval Frame Scallop Die, Ovals Die and Beautiful
Butterflies


Friday, April 13, 2012

Disney, here we come!

I received my Travel Pouch from Stampin' Up! this week.  When you earn the Grand Vacation, Stampin' Up! sends all of your travel documents in some kind of cute pouch about 2 weeks before the trip.  You get your itinerary, name tags, luggage tags, plane tickets, etc.  I work hard every year to earn these trips.  This is the highlight of my year!  Stampin' Up! has given me the opportunity to travel and experience wonderful, beautiful places.  Thanks to  you, my loyal customers, I have earned all but one trip since being a demonstrator.  And thank you Stampin' Up! for giving me this goal to work toward every year!!


Spring Soiree Srtamp Camp


We had a really great Stamp Camp last month (March 24th).  I wanted to post pictures of the projects we made.  If you like what you see you will want to sign up for our Holiday Stamp camp this fall!  We do two Stamp Camps a year, one in the fall and one in the spring. They are all day affairs and we typically make 8 to 10 projects.Our ladies had a lot of fun and really enjoyed the projects.

Most of our projects  used the Everyday Enchantment Designer paper that was FREE during Sale-a-bration.  This is one of my very favorite papers and I am sad that we can't get it any more, but we have a lot of cute projects made with it.

I hope you enjoy looking at all the fun projects we made!


 PROJECTS:


This sweet little card was created with the Tea Shoppe Stamp set, which is in the Occasions Mini Catalog that expires April 30th!  Shelli Gardner demoed this card at Leadership. The colors are Island Indigo and More Mustard.  Notice the tea bag tucked into the teacup?


This was a little mini scrapbook made with vinyl name badge holders. We used 6 holders which make 12 mini pages.  This is the perfect little brag book to tuck into your purse! (that is my very cute grandson!)

Framed wall art.  I saw this idea, but it was done in different colors.  This would be beautiful in any color combination.  This piece uses First Addition Specialty DSP, Crochet Trim, 1/2" Stitched Poly Ribbon (pear pizazz), Big Shot, Beautiful Butterflies Die, Beautiful Wings Embosslit Die and Just Believe Stamp Set.
 
Refrigerator Magnet.  What a cute way to display a picture!  We used the cut out piece to make a second magnet. One of my fellow demonstrators, Patti received one of these as a swap at Leadership. We knew we had to include this project in our stamp camp!

Card Box with Build- a- cards.  Cute little storage box that holds 5 note card with envelopes (2 shown here).  There are different greeting that are pre-stamped with a dimensional on the back.  When you need a card, you just pick a coordinating greeting and stick it on your card.  Clever, huh?

This is a fold out 6 x 6 scrapbook. This was created by Missy Shipman and she demoed it at Leadership.  We just loved the design and the idea.


This little flower pot is the perfect spring gift.  Just cut Stampin' Up! Chalkboard Vinyl with the Big Shot and the oval die, and tie some ribbon on.  Then make your own Plant Stake with the Big Shot and aluminum, wire and a brad.  How cute is this??
Candy Bouquet